Rejected Cosmetic Procedure Ads: Meta Review Steps

Rejected Cosmetic Procedure Ads: Meta Review Steps
When Meta rejects a cosmetic procedure ad, I start with the rejection notice - not a rewrite. I match the cited rule to the ad, audience settings, and landing page before changing anything.
My checklist has three steps:
- Check the issue: Save the notice, confirm whether it affects the ad or account, and check the treatment rules and 18+ targeting.
- Fix and document: Correct flagged copy, images, claims, settings, or page content. Keep a record of each change.
- Request review when warranted: Explain the correction or policy error, then track the decision without duplicate requests or further edits.
An account restriction needs a separate review. And <u>18+ targeting alone does not make an ad compliant</u>. I keep the notice, edits, claim support, and final decision in one file - because neither an appeal nor a consultant can guarantee approval.
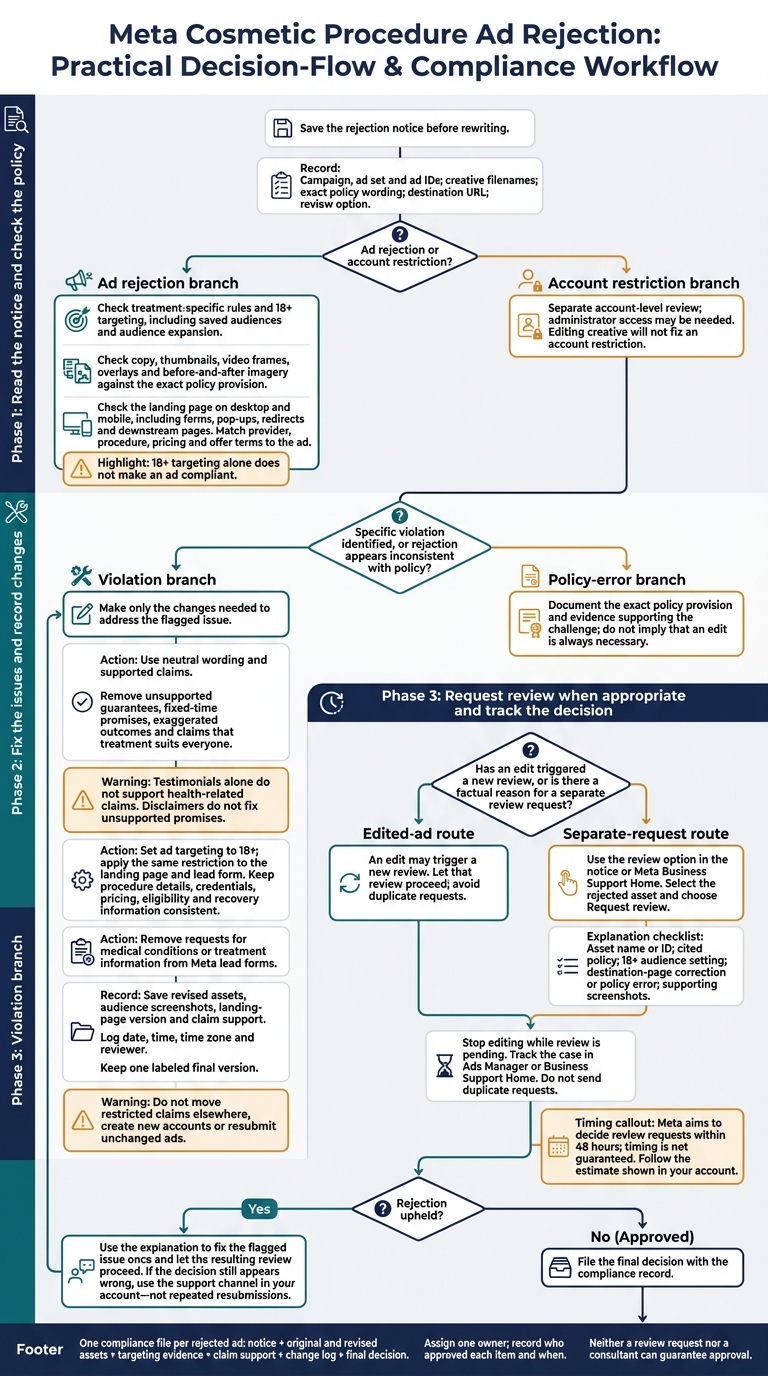
Meta Cosmetic Procedure Ad Rejection Review Steps
Step 1: Read the Notice and Check the Policy
Record the Rejection Details
Open Business Support Home or Account Quality and save a screenshot of the notice. Record the campaign, ad set, ad IDs, creative filenames, exact policy wording, destination URL, and review option.[2][5][6]
In Business Support Home, confirm whether the issue affects one ad, several assets, or the entire account. An ad rejection usually applies to a specific campaign, ad set, ad, or asset. An account restriction can affect the ad account, Page, user account, or business portfolio.[6][9]
Editing the creative won’t fix an account-level restriction. That requires a separate review process and may need administrator access.[6][9]
These details help you determine whether Meta flagged the targeting, creative, or landing page.
Check Age Limits and Treatment Rules
Cosmetic procedure rejections often stem from age targeting or treatment-specific restrictions. Confirm that the ad set targets people 18 or older, including saved audiences and audience expansion.[7][8]
Check Meta’s current Health and Wellness policy for the treatment you’re advertising, such as dermal fillers, chemical peels, or hair-restoration surgery. Age targeting alone doesn’t make an ad compliant.[7][8]
If the age settings are correct, check the ad creative and landing page next.
Check Ad Content and the Landing Page
Review the copy, thumbnails, video frames, and overlays. Look for language or imagery that implies personal attributes or medical conditions, shames people’s bodies, promises unsupported results, or sets unrealistic timelines. Check before-and-after images against the treatment-specific rule - don’t assume they’re always allowed or always prohibited. Match each flagged phrase or asset to the exact policy provision.[1][8]
Open the landing page on both desktop and mobile. Confirm that the provider, procedure, pricing, and offer terms match the ad. Check forms, pop-ups, redirects, and downstream pages for stronger claims, conflicting content, or access problems. Tie each issue to the specific policy rule so you fix the actual violation.[1][3]
sbb-itb-db0d145
Step 2: Fix the Issues and Record Changes
Make only the changes needed to address the specific issue Meta flagged in the rejection notice.
Use Neutral Wording and Supported Claims
Focus the copy on the consultation, provider qualifications, eligibility, and treatment details - not the viewer’s perceived flaws. Remove unsupported guarantees, fixed-time promises, exaggerated outcomes, and claims that treatment suits everyone. Keep only claims backed by current provider records.[10][11][13]
Testimonials alone don’t support health-related claims. Disclaimers don’t fix unsupported promises, either. Revise or remove those promises.[11][12][14] Make sure the revised copy and visuals communicate the same supported claim. Neutral wording still doesn’t guarantee Meta approval.[2][3]
Update Settings and Save Your Records
Set the ad set’s age restriction to 18+, and apply the same restriction to the landing page and lead form. Keep procedure details, credentials, pricing, eligibility, and recovery information consistent across the ad, page, and form. Remove requests for medical conditions or treatment information from Meta lead forms.[1]
Document each change so the next review covers the corrected version. Save the revised assets, audience screenshots, landing-page version, and records supporting your claims. Log the date, time, time zone, and reviewer for every change. Keep one clearly labeled final version to check against the notice before submission.
Do not move restricted claims into images, captions, testimonials, or destination pages. Don’t create new accounts or resubmit unchanged ads. Once you’ve documented the corrected version, move to Step 3. Request another review only if the ad addresses the issue identified in the notice.
Step 3: Request Another Review When Appropriate
Use this step only after fixing the ad or when the rejection appears inconsistent with the policy. An edit may trigger a new review. Submit a separate request only if you have a factual reason to challenge the rejection.[2][3]
Explain Your Review Request
Open the review option in the rejection notice or go to Meta Business Support Home. Select the rejected ad, ad set, or campaign, choose Request review, and follow the on-screen instructions.[2]
If you can add a written explanation, include the asset name or ID, the cited policy, the 18+ audience setting, the destination page correction or policy error, and supporting screenshots.[2][3][4]
After submitting, stop editing the same campaign until Meta responds.
Wait for the Decision Before Acting
Track your case in Ads Manager or Business Support Home and follow the review estimate shown there. Meta aims to decide review requests within 48 hours, but that timing isn't guaranteed. Don't send duplicate requests while you wait. Editing campaign components under review can trigger another review.[2][3]
If Meta upholds the rejection, use its explanation to fix the flagged issue once, then let the resulting review proceed. If the decision still appears wrong, use the support channel in your account rather than resubmitting the same ad.[2][3]
Conclusion: Document Each Compliance Check
After deciding whether to edit the ad or request a review, close the case by filing the compliance record. Keep one record for each rejected ad. Link the rejection notice to the corrected assets and final decision. Store the original and revised versions in the same compliance file.
Assign one owner to oversee treatment claims, targeting, ad content, and landing-page accuracy. Record who approved each item, when they approved it, and whether age targeting stayed at 18+.[7][10]
Use this file to support a final review request only if the rejection appears incorrect or the ad now complies.[2][3]
Dancing Chicken offers Meta Ads consulting, ad account audits, and ad design services. It cannot override Meta decisions or guarantee approval. Document its recommendations in the same file; the advertiser remains responsible for the final ad.
FAQs
What if Meta’s rejection notice is unclear?
Compare the flagged ad against Meta’s Advertising Standards, linked in your rejection email or Ads Manager. Terms like Personal Attributes or Sensational Content refer to specific policy areas.
If the rejection reason seems unrelated to your ad, an automated error may be to blame. Go to Business Support Home with your Business Account ID and Ad ID ready. Request a manual review and explain how your ad follows the policy.
What evidence best supports my review request?
Gather clear, objective documentation showing that your ad follows Meta’s Advertising Standards. Include research studies, certifications, or testimonials that support your claims, plus relevant screenshots.
Keep your Business Account ID and Ad ID ready. If you think an automated error caused the rejection, briefly explain how your ad’s visuals, copy, or landing page meets the policy requirements.
What if the review option is missing?
If you don’t see an option to request a review, go to Meta Business Support Home. You can manage account issues there and find appeal channels that may not appear in Ads Manager. Have your Business Account ID and the specific Ad ID ready.
Still having trouble? Check whether your account is restricted. Some enforcement actions may limit your ability to submit more appeals.