Meta Ads Tracking Setup: 9 Checks for Reliable Data

Meta Ads Tracking Setup: 9 Checks for Reliable Data
I don’t treat an active Meta Pixel as proof that reports are ready. Before using Meta results to guide spending, I test a completed conversion, check that it counts once, and compare it with the lead or order record.
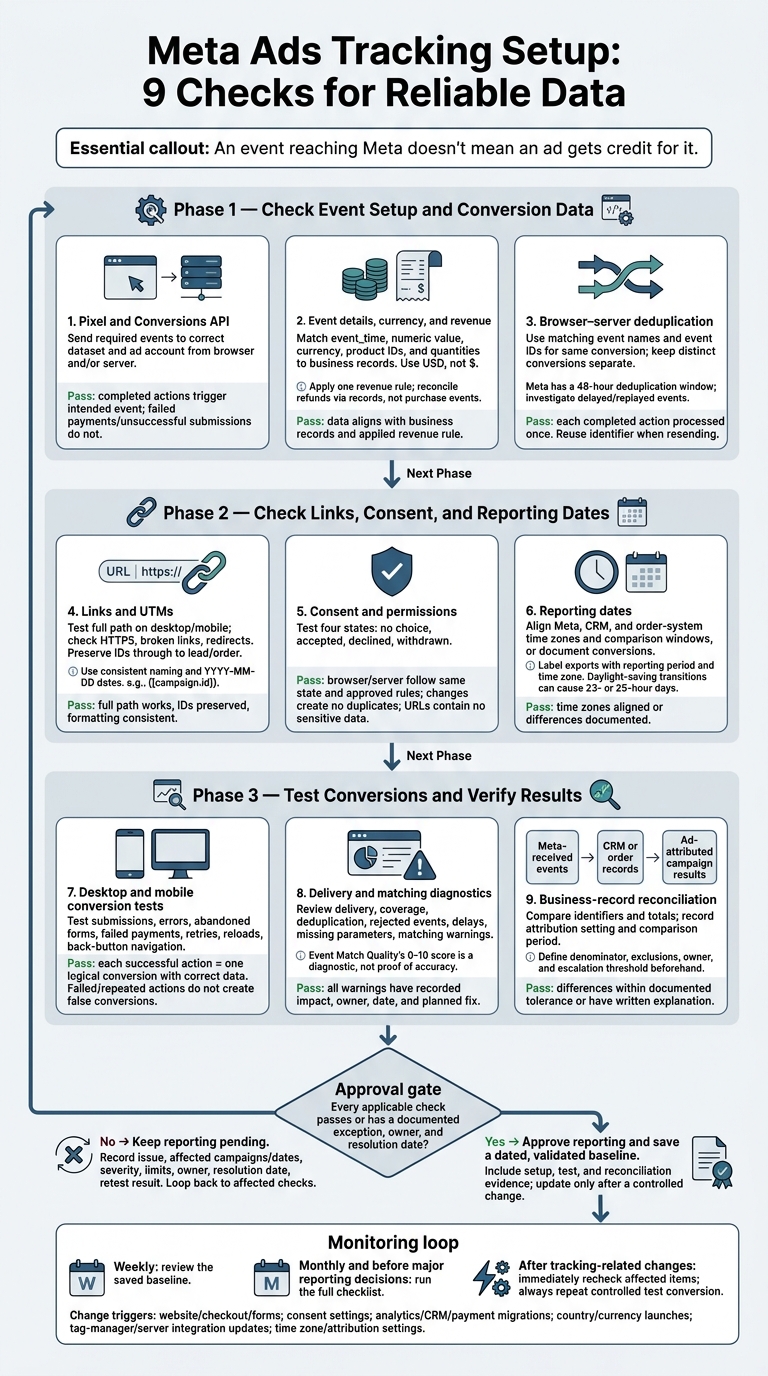
I use these 9 checks to review the setup:
- Pixel and Conversions API: Send the right events to the right dataset.
- Event details: Match values, currency, and product data to business records.
- Deduplication: Use matching event names and IDs so browser and server events don’t count twice.
- Links and UTMs: Keep campaign details attached through the lead or purchase.
- Consent: Make browser and server tracking follow the user’s choices.
- Reporting dates: Align time zones and comparison periods.
- Conversion tests: Test desktop and mobile, including failed payments and retries.
- Diagnostics: Review delivery errors and matching warnings - not just the 0–10 Event Match Quality score.
- Business records: Compare received events, recorded outcomes, and ad-attributed results separately.
My rule: <u>approve reports only after each applicable check passes or has a documented exception</u>. I save a dated baseline, review it weekly, and repeat the full checklist monthly - and test again after tracking-related changes. An event reaching Meta doesn’t mean an ad gets credit for it.
Meta Ads Tracking Setup: 9 Checks for Reliable Data
Checks 1–3: Check Event Setup and Conversion Data
1. Check Pixel and Conversions API Setup
In Meta Events Manager, confirm that the dataset matches the intended website and connects to the correct ad account. Make sure it receives the campaign’s optimization event, such as Lead or Purchase.
Use Test Events to confirm that a lead fires after a successful form submission and a purchase fires after order completion - not when someone clicks a button or loads the checkout page. Pass: completed actions trigger the intended event; failed payments and unsuccessful submissions do not.[3]
Record whether each event comes from the browser, server, or both, and document which source sends it. Fix missing events or incorrect connections before approving this check.[1][4]
2. Check Event Parameters, Currency, and Revenue
Compare each purchase payload with its order record. Check event_time, numeric value, currency, product IDs, and quantities. The currency field must use the three-letter code USD, not a dollar sign.[6][7]
Pass: discounts, tax, and shipping follow one documented revenue rule. Reconcile refunds and cancellations through business records - don’t send them as additional purchases.
3. Check Browser–Server Deduplication
Review matching browser and server events in Test Events and deduplication diagnostics. Look for missing identifiers, capitalization differences, independently generated IDs, or an ID reused across separate orders. Reload the confirmation page and use back-button navigation to check for repeated triggers.[1][3][5]
Pass: each completed action is processed once, and separate conversions stay separate. When resending the same event, reuse its original identifier. Meta documents a 48-hour deduplication window, so investigate delayed or replayed events rather than assuming they’ll be discarded.[1]
Next, verify links, consent, and reporting dates before reviewing performance.
sbb-itb-db0d145
Checks 4–6: Check Links, Consent, and Reporting Dates
4. Test Destination URLs and UTM Parameters
Once event data is correct, test destination URLs and UTMs to make sure ad clicks connect to the right lead or order. Follow the full path through confirmation on desktop and mobile. Check HTTPS, broken links, and redirect loops.
Confirm that source, medium, campaign, ad set, and ad IDs or names stay in the URL, first-party storage, or session data - and appear in the lead or order record. Use one naming convention and YYYY-MM-DD dates. In Ads Manager, use dynamic parameters such as {{campaign.id}}, {{adset.id}}, and {{ad.id}} so you can match records even after names change.[8][10] Save the final URL as evidence.
5. Check Consent and Data Permissions
Once the path works, test four consent states: no choice, accepted, declined, and withdrawn. Inspect browser requests and server logs to check each state against the approved data-collection rule. Pass only when the browser and server follow the same consent state.[9][11]
Check that consent changes don’t create duplicate events and that URLs and payloads contain no sensitive data. Log the timestamp, consent state, event ID, and resulting event record.
6. Align Time Zones and Reporting Periods
After checking consent, confirm that reporting dates match across systems. Compare the Meta ad account time zone with your CRM and order system, including UTC offsets and daylight-saving rules. Single-account Meta reports use the ad account’s time zone. Cross-account reports use the business portfolio time zone, or UTC if none is selected.[12]
Pass: Reports use the same time window or a documented timestamp conversion. Label each export with the report date and time zone:
November 4, 2026, 12:00 a.m.–11:59 p.m. Eastern Time
Check daylight-saving transitions separately: a local reporting day can contain 23 or 25 hours.[12]
Checks 7–9: Test Conversions and Verify Results
7. Test Desktop and Mobile Conversions
Once you’ve checked setup, consent, and dates, test conversions from start to finish.
Keep Test Events open and test each primary journey on desktop and mobile.[3] Include lead forms, checkout, account creation, phone or appointment requests, and purchases. Check successful submissions, validation errors, abandoned forms, failed payments, retries, page reloads, and back-button use.
Log the test date and timestamp, device, browser, journey, expected event, event ID, and lead or order ID.
Pass: Each successful action produces one logical conversion with the correct event name, event ID, value, currency, order or lead identifier, and relevant parameters. Failed or repeated actions must not create false conversions. Receiving an event does not mean Meta attributed it to an ad.[2]
8. Review Event Delivery and Matching Diagnostics
In Events Manager, check delivery, coverage, server details, deduplication, rejected events, delays, missing parameters, and matching warnings. Confirm that expected events reach the right dataset and include the event name, time, action source, currency, value, event ID, and transaction ID.
For each unresolved warning, record its impact, owner, date, and planned fix.
Treat Event Match Quality’s 0–10 score as a diagnostic, not proof of accuracy.[14] Read it alongside event volume, coverage, and deduplication. A high score doesn’t prove that revenue is correct or that every conversion received the right attribution.
9. Compare Meta Results With Business Records
After checking diagnostics, compare Meta results with CRM and order records. Then review attributed performance.
Reconcile three things separately: Meta-received events, CRM or order records, and attributed campaign results. Follow the chain: Meta received the event, your system recorded the outcome, and the report attributed the conversion.
Use identifiers and totals to compare received leads or purchases with recorded outcomes. When reviewing attributed campaign results, use the attribution setting recorded alongside the comparison period.[13]
Pass: Differences stay within a documented, business-specific tolerance or have a written explanation. Before reviewing results, define the comparison period, denominator, exclusions, owner, and escalation threshold.
Investigate attribution-window gaps, consent loss, browser blocking, delayed or duplicate events, date mismatches, refunds, cancellations, offline updates, and modeled attribution. Check unexplained gaps before changing the budget.
Conclusion: Approve Reports and Schedule Tracking Checks
Approve reporting only when every applicable check passes or has a documented exception, owner, and resolution date. Replace each [MM/DD/YYYY] with the test date, and assign one named owner to each row.
| Check | Where to Verify | Pass Condition | Owner | Last Tested |
|---|---|---|---|---|
| Pixel and Conversions API | Events Manager → Data Sources | Required events arrive from expected sources | Tracking owner | [MM/DD/YYYY] |
| Parameters, currency, and revenue | Event details and test purchase/lead record | Parameters match business records | Analytics owner | [MM/DD/YYYY] |
| Deduplication | Event Deduplication or server event details | Matching event names and IDs; no double counting | Developer | [MM/DD/YYYY] |
| Links and UTMs | Live ads, landing pages, and analytics reports | URLs work and campaign parameters persist | Paid media owner | [MM/DD/YYYY] |
| Consent and permissions | Consent platform, Events Manager, and privacy settings | Tracking respects consent choices and permissions | Privacy owner | [MM/DD/YYYY] |
| Time zones and periods | Ad account settings and reporting exports | Reporting windows align or have documented conversions | Analytics owner | [MM/DD/YYYY] |
| Test conversions | Test Events and controlled desktop/mobile journeys | Each successful action produces one conversion | QA owner | [MM/DD/YYYY] |
| Diagnostics and matching | Events Manager diagnostics and matching diagnostics | No unresolved critical issues; delivery and matching are acceptable | Tracking owner | [MM/DD/YYYY] |
| Business-record reconciliation | CRM, ecommerce platform, or finance system | Differences are explained or within documented tolerance | Marketing analyst | [MM/DD/YYYY] |
If a check fails, keep reporting pending. Record the issue, affected campaigns or dates, severity, temporary reporting limits, assigned owner, target resolution date, and retest result.
After all nine checks, save a dated, validated baseline for future comparisons. Include the setup, test, and reconciliation details needed to reproduce it. Update this baseline only after a controlled change.
Review the baseline weekly. Run the full checklist monthly and before major reporting decisions. Recheck affected items immediately after any of these changes:
- Website redesigns; checkout or form changes; consent-management updates
- Analytics or CRM migrations; payment-platform changes; new country or currency launches
- Tag-manager publication; server-side integration updates; account time zone or attribution setting changes
Always repeat a controlled test conversion after deployment and compare the result with the saved baseline. Meta’s Events Manager provides diagnostics, deduplication, matching diagnostics, and data freshness views to help monitor tracking.[15]
If event delivery remains inconsistent or browser and server events still don’t match, Dancing Chicken offers Meta Ads audits and tracking support.
FAQs
How much discrepancy between Meta and my CRM is acceptable?
Small differences between Meta Ads and your CRM are normal. Attribution models, processing times, and time zone settings can all cause discrepancies. Investigate gaps that go beyond these expected differences.
To reduce mismatches, match your time zone settings, export data in full-day increments, and align attribution windows where possible. If differences persist and follow a predictable pattern, you can apply historical adjustment factors to bring Meta’s reporting closer to actual CRM revenue.
How can I test purchases without inflating reports?
Use the Test Events tool in Meta Events Manager to check purchase events without adding test data to your live campaign reports. Open the Test Events tab, enter your website URL, and complete a test purchase on your site.
Events appear in real time. You can review event names and parameters and check whether deduplication is working - all separate from your actual ad performance metrics.
Which tracking issues should I fix first?
Check that Meta Pixel and Conversions API record browser and server-side events. In Meta’s Events Manager, use Test Events to confirm events fire correctly and use matching event IDs to prevent duplicate counting.
Then check three-letter currency codes, such as USD, and decimal values. Standard event names must match exactly, including capitalization - for example, Purchase.
Align time zones across your analytics tools, CRM, and Meta. Set attribution windows to match your sales cycle.